Introduction: The official release of Cocos Creator 3.8.0 is being prepared in full swing. While we wait, Iwae brings you 7 cool Cocos shader transitions with source code.
This article is part of a card game project created by iwae with AIGC. Interested developers can check out the previous articles: AIGC for a 3D Snake Game.
Preface
I am nearing the end of my card game project using AIGC tools with Cocos Creator.
But recently, I encountered a headache, that is, how to implement the transition effect smoothly and vividly.
After a lot of exploration, I finally used Cocos Shader to achieve this. With GPU computing power, these transitions can run efficiently on all platforms. In the process, I experimented with several effects and wrote a total of 7 transitions, which I now share with you in the hope that it will help you.
Preview address: http://learncocos.com/shader1/
Next, let's see the concrete implementation for the corresponding effects.
Note: The images involved in the transition effect cannot be used in the packable image. The packable image will be converted to UV, and the effect will be incorrect. Select the corresponding image in Assets and uncheck the Packable property in the Properties panel.
1. Linear wipe transitions
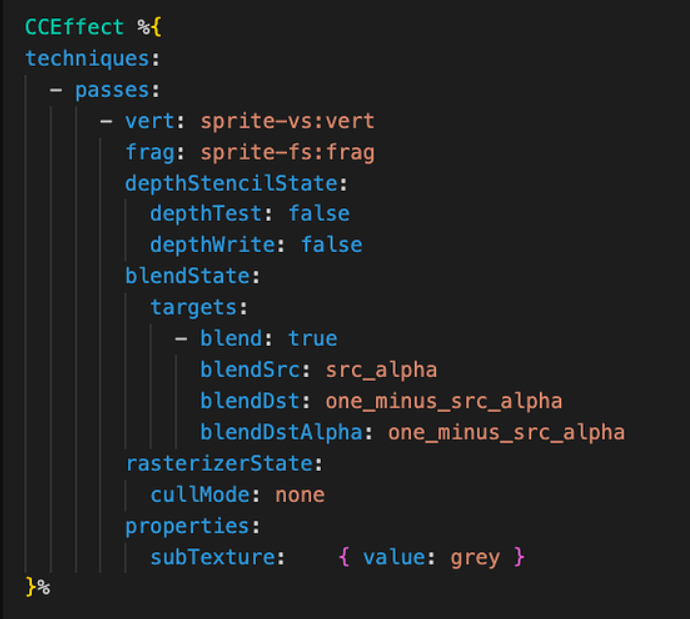
The shader for the transition needs two images, the main image uses the default sprite, and for the image that needs to be transitioned, we can create a new subTexure property.
The linear transition effect is relatively simple, and the key Shader code is as follows:
#include <builtin/uniforms/cc-global>const float tranSize = 0.1; vec4 LinearTransition(vec4 color,vec4 mixcolor, vec2 uv, float progression,bool isUVX) { float dir = isUVX?uv.x:uv.y; float f = dir*(1.0-tranSize) + tranSize - (progression * (1.0 + tranSize)); float m = smoothstep(0., -tranSize,f); color = mix(color,mixcolor,m); return color;}
The smoothstep function is used here, so let's look at the source code for smoothstep:
float smoothstep(float t1, float t2, float x) { // Scale, bias and saturate x to 0..1 range x = clamp((x - t1) / (t2 - t1), 0.0, 1.0); // Evaluate polynomial return x * x * (3 - 2 * x);}
As seen in the source code, it returns a smooth transition value of [0,1] based on the distance of x between t1 and t2. Here f = dir *(1-s)+s-p*(1+s) is used to make the selected uv-axis direction and return the mixing factor under the progress parameter.
The final result achieved is as follows (please check the background for the effect):
2. A wind-blowing linear transition
Adding a random wind-blowing effect to the linear transition, the Cocos Shader code is as follows:
#include <builtin/uniforms/cc-global>

// Variables
const float tranSize = 0.25;

float rand (vec2 co) {
  return fract(sin(dot(co.xy ,vec2(12.9898,78.233))) * 43758.5453);
}

vec4 WindTransition(vec4 color,vec4 mixcolor, vec2 uv, float progression) {
  float r = rand(vec2(0, uv.y));
  float m = smoothstep(0.0, -tranSize, uv.x*(1.0-tranSize) + tranSize*r -
         (progression * (1.0 + tranSize)));
  color = mix(color,mixcolor,m);
  return color;
}
The final result achieved is as follows:

3. Radial wipe transition
#include <builtin/uniforms/cc-global>float rule(vec2 coord){ vec2 uv2 = coord - vec2(0.5, 0.5); float angle = atan(uv2.x, uv2.y); return angle / 2.0 / 3.1416 + 0.5;}vec4 CircleTransition(vec4 color,vec4 mixcolor, vec2 uv, float progression) { float rule = rule(uv); float vague = 0.2; float phase = progression * (1.0 + vague); float p0 = smoothstep(rule, rule + vague, phase); color = color * (1.0 - p0) + mixcolor * p0; return color;}
The final result achieved is as follows:
4. Mosaic transition
float smoothness = 0.5; // 0-1float rand (vec2 co) { return fract(sin(dot(co.xy ,vec2(12.9898,78.233))) * 43758.5453);}const float tranSize = 10.;vec4 RandomTransition(vec4 color,vec4 mixcolor, vec2 uv, float progression) { float r = rand(floor(vec2(tranSize) * uv)); float m = smoothstep(0.0, -smoothness, r - (progression * (1.0 + smoothness))); color= mix(color, mixcolor, m); return color;}
The final result achieved is as follows:

5. Stripe square transition
Note: This effect is from shadertoy
#include <builtin/uniforms/cc-global>const float tranSize = 32.;vec4 BoxTransition(vec4 color,vec4 mixcolor, vec2 uv, float progression) { vec2 fragCoord = gl_FragCoord.xy; vec2 blockPos = vec2(progression) * cc_screenSize.xy; vec2 p = ceil(fragCoord / tranSize) * tranSize; float progress = (p.x + p.y) / (blockPos.x + blockPos.y); vec2 v = abs(fragCoord - p + vec2(tranSize/2.)); if (max(v.x, v.y) * progress < tranSize/2.) { color = mixcolor; } return color;}
The final result achieved is as follows:

6. Stripe diamond transition
#include <builtin/uniforms/cc-global>const float tranSize = 32.;vec4 SideTransition(vec4 color,vec4 mixcolor, vec2 uv, float progression) { uv.x = 1.0 - uv.x; float xFraction = fract(gl_FragCoord.x / tranSize); float yFraction = fract(gl_FragCoord.y / tranSize); float xDistance = abs(xFraction - 0.5); float yDistance = abs(yFraction - 0.5); if (xDistance + yDistance + uv.x + uv.y < progression * 4.0) { color = mixcolor; } return color;}
The final result achieved is as follows:
7. Burning transition
Note: This effect can be combined as the second image is not used
float fr(vec2 c, float seed) {return fract(43.0 * sin(c.x + 7.0 * c.y) * seed);}float fn(vec2 p, float seed){ vec2 i = floor(p), w = p - i, j = vec2(1.0, 0.0); w = w * w * (3.0 - w - w); return mix(mix(fr(i, seed), fr(i + j, seed), w.x), mix(fr(i + j.yx, seed), fr(i + 1.0, seed), w.x), w.y);}float fa(vec2 p, float seed) { float m = 0.0, f = 2.0; for (int i = 0; i < 6; i++) { m += fn(f * p, seed) / f; f += f; } return m;}vec4 BurnOut(vec4 MainColor, vec2 UV, float Intensity) { float t = fract(Intensity * 0.9999); float cc = smoothstep(t / 1.2, t + 0.1, fa(3.5 * UV, 1.)); vec4 c = vec4(cc); c = MainColor * c; c.r = mix(c.r, c.r * 15.0 * (1.0 - c.a) * 8.0, Intensity); c.g = mix(c.g, c.g * 10.0 * (1.0 - c.a) * 4.0, Intensity); c.b = mix(c.b, c.b * 5.0 * (1.0 - c.a), Intensity); return vec4(c.rgb, c.a);}
The final result achieved is as follows:
You can take these effects and apply them to screenshots, scene switching, battle start, card dissolve, draw system, etc.
I hope the above sharing can bring effect and development efficiency to your projects, so that you can make better products faster with Cocos Creator.
Code Download
The above source code is free and open source on the Cocos Store!
That's all for today, download it now!